How to Convert a Chlorine Pool to Saltwater (Step-by-Step)
TL;DR: Converting a chlorine pool to saltwater mostly comes down to installing a salt chlorine generator (SWG), balancing your water chemistry, adding the right amount of salt, and letting the generator do the work of producing chlorine going forward. Your existing pump, filter, and liner almost always stay as they are. Most DIY conversions take a weekend and cost between $400 and $1,800 depending on the size of your pool and whether you hire a pro for installation.
If you're tired of hauling jugs of chlorine and dealing with the smell and skin irritation that comes with traditional chlorine pools, converting to saltwater is one of the most popular upgrades pool owners make. The good news is that it's a much smaller project than people expect. You're not redoing your whole pool. You're adding one main piece of equipment and adjusting your water chemistry to match.
Here's exactly what that process looks like from start to finish.
What you actually need to convert (the equipment list)
The only piece of equipment that truly makes this a "saltwater pool" is the salt chlorine generator, often called an SWG or salt cell. This device uses electrolysis to convert dissolved salt in your water into chlorine, so you stop adding chlorine manually and the system produces it on its own as water passes through.
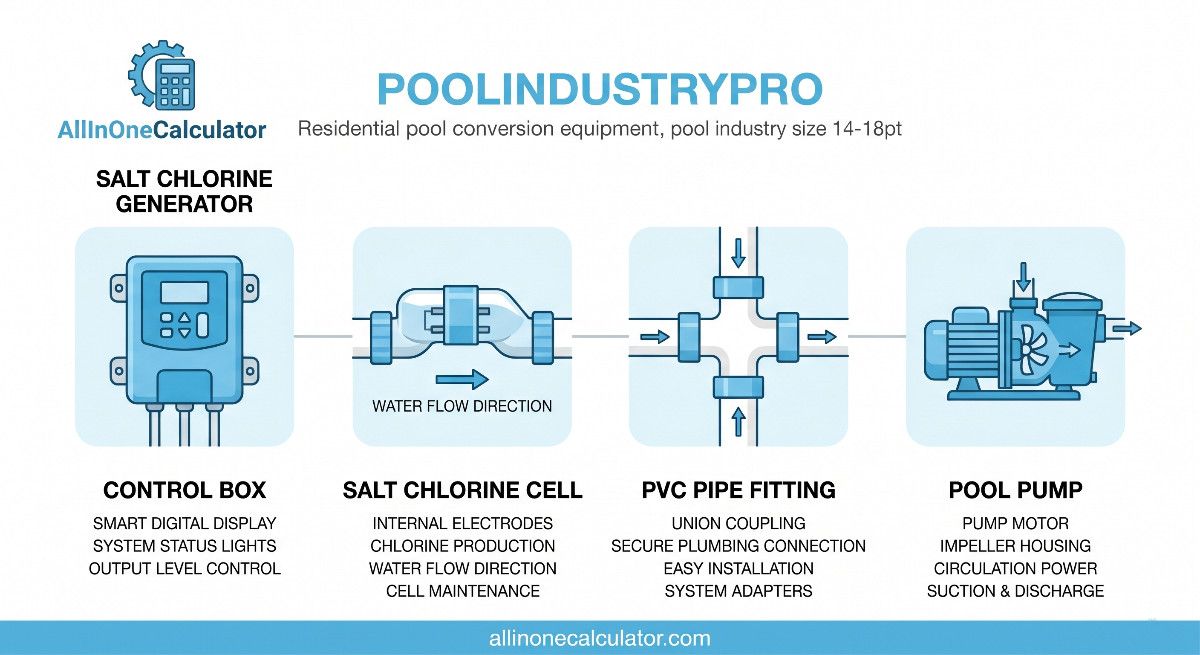
A full SWG setup includes the control box (mounted near your equipment pad) and the cell itself, which gets plumbed into your existing pipe system after the filter and before the water returns to the pool. Installation basics are straightforward for anyone comfortable with basic pool equipment work: cut into the return line, install the cell, wire the control box to power, and connect it to your existing pump timer or automation system if you have one.
Compatibility is rarely an issue. Most pumps and filters built in the last couple of decades work fine with an SWG added downstream. The main thing to check is that your plumbing has room for the cell and that your pump's flow rate matches what the generator manufacturer recommends.
What you don't need to change (liner, pump, filter are usually fine)
This is where a lot of people get nervous for no reason. You do not need to replace your vinyl liner, your pump, or your filter to switch to saltwater.
Salt levels in a saltwater pool are much lower than people assume, usually somewhere between 2,700 and 3,400 ppm, which is roughly a tenth the salinity of ocean water. That concentration is mild enough that it doesn't damage vinyl liners, fiberglass, or properly sealed concrete and plaster surfaces. Pumps and filters aren't affected either, since they're not in constant contact with concentrated salt in any different way than they were with chlorinated water before.
The exception is older metal fixtures, ladders, lights, or heaters that may already be showing wear. Salt can accelerate corrosion on metal that's already compromised, so it's worth a quick visual check before you start, but for most pools this isn't a real obstacle.
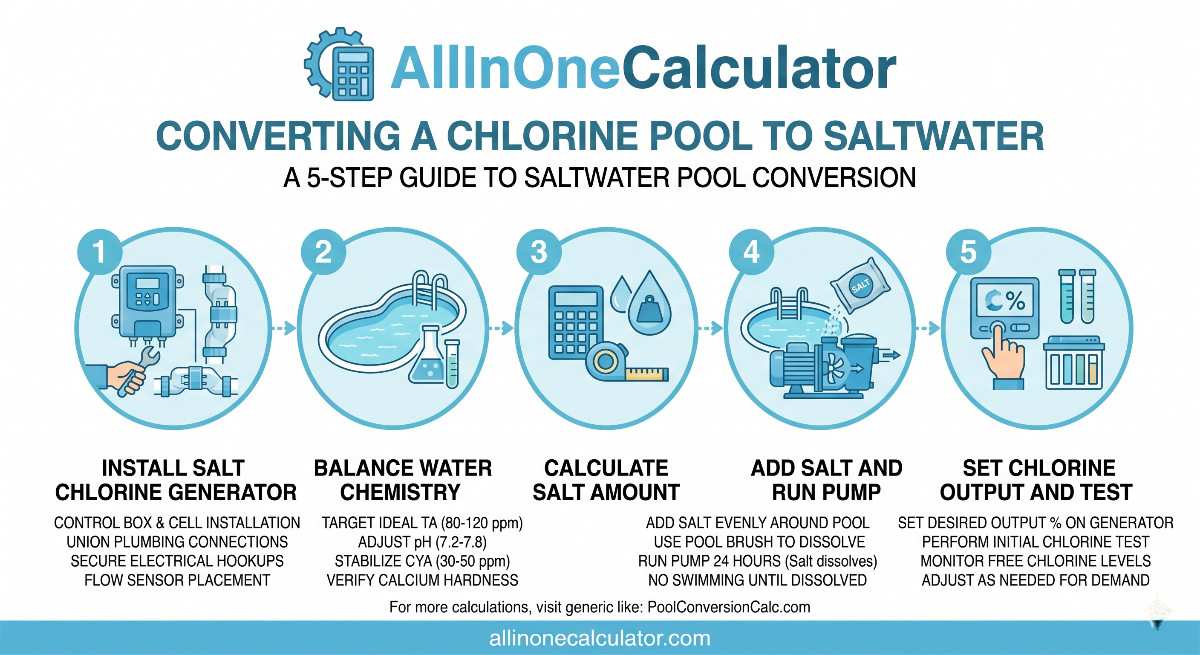
Step 1: Choose and install your salt chlorine generator
Start by picking an SWG sized for your pool's gallon capacity. Manufacturers list a recommended pool size range for each model, so undersizing it means the cell will wear out faster trying to keep up, while oversizing just costs more without much benefit.
Hayward, Pentair, and Jandy are the three brands you'll run into most often, and all three make reliable residential units. Hayward's AquaRite line, Pentair's IntelliChlor, and Jandy's AquaPure are common picks, and any local pool supply store will be familiar with installing and servicing them.
If you're comfortable with basic plumbing and electrical work, installation is a manageable DIY project, usually a half day of cutting into PVC, gluing in the cell housing, and wiring the control box. If that's outside your comfort zone, a pool professional can usually complete the install in a few hours.
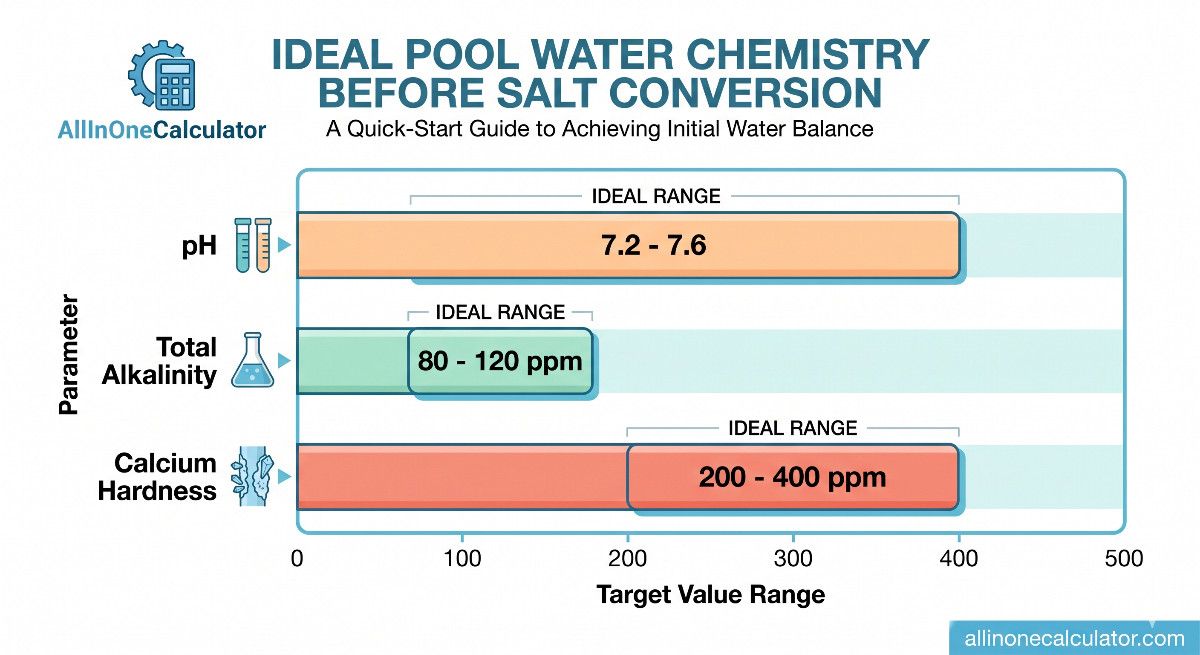
Step 2: Balance your existing water chemistry before adding salt
Before you add a single bag of salt, get your existing water chemistry into range. Salt systems are sensitive to imbalanced water, and starting with bad chemistry just means you'll be fighting problems later instead of enjoying a low-maintenance pool.
The targets you want before moving forward:
pH between 7.2 and 7.6
Total alkalinity between 80 and 120 ppm
Calcium hardness between 200 and 400 ppm
Test your water with a reliable test kit or strips, and adjust with standard pool chemicals (pH increaser or decreaser, alkalinity increaser, calcium hardness increaser) as needed. This step has nothing to do with salt yet. It's just making sure your water is in a healthy starting place before the conversion begins.
Step 3: Calculate how much salt to add for startup
This is the step people get wrong most often, because adding too little salt means your generator can't produce chlorine effectively, and adding too much can trip the system's high salt alarm or just waste money.
The right amount depends entirely on how many gallons your pool holds and how much salt, if any, is already in the water. Rather than guessing, use our free pool salt calculator to find your exact startup salt dose based on your pool's gallons. Just plug in your pool size and current salt reading (if you know it) and it will tell you exactly how many pounds of salt to add to hit your target range.
If you want a deeper breakdown of how the math works and what affects dosing, our guide on how much salt to add to a pool walks through it in more detail.
Step 4: Add the salt and run the pump
Once you know your target amount, add the salt directly into the pool water, not into the skimmer or pump basket. Pour it in slowly around the perimeter of the pool with the pump running, rather than dumping it all in one spot, which can cause salt to settle and take longer to dissolve.
After adding it, run your pump continuously for at least 24 hours. This circulates the water enough to fully dissolve the salt and prevents it from settling on the pool floor, which can sometimes cause cosmetic staining on plaster or vinyl if left undissolved for too long. Brushing the pool floor periodically during this time helps speed up dissolving too.
Step 5: Set your SWG chlorine output and test
Once the salt has fully dissolved, usually after that 24 hour period, turn on your salt chlorine generator and set the output percentage. Most systems start somewhere in the 40 to 60 percent range for an average residential pool, though this varies by pool size and bather load.
Wait at least 24 hours after starting the generator before testing chlorine levels, since it takes time for the system to start producing and circulating chlorine through the water. You're looking for free chlorine in the 1 to 3 ppm range and salt levels matching the range your generator manufacturer recommends, typically around 3,000 ppm.
For a full walkthrough on testing salt levels accurately going forward, including which tools give the most reliable readings, check out our guide on how to test pool salt levels.
Saltwater pool conversion cost (DIY vs. professional)
Cost varies quite a bit depending on pool size and whether you do the install yourself.
For a DIY conversion, expect to pay roughly 400 to 900 dollars for the SWG unit itself, plus 50 to 150 dollars for salt depending on pool size, putting most DIY conversions in the 450 to 1,050 dollar range total.
For professional installation, add labor costs on top of equipment, typically another 300 to 700 dollars depending on your area and how complex the plumbing work is. All in, professional conversions usually land between 750 and 1,800 dollars.
Larger pools, more complex plumbing, or older equipment that needs upgrading alongside the SWG can push costs higher in either scenario.
Is a saltwater pool worth it? Pros and cons
Saltwater pools have become popular for good reason, but they're not automatically the right choice for everyone.
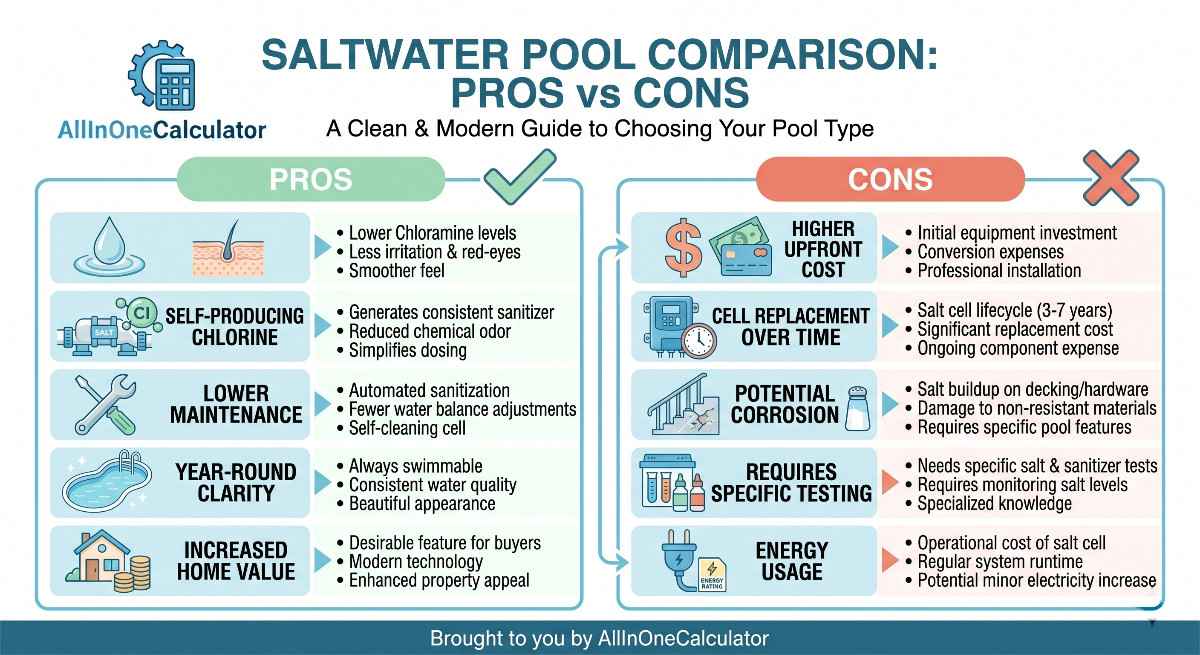
On the plus side, saltwater pools tend to feel gentler on skin and eyes since they don't have the harsh chlorine smell or irritation that comes with manually dosed pools. They also require less day to day maintenance once set up, since the generator handles chlorine production automatically instead of you adding it by hand.
On the downside, the upfront cost is higher than sticking with manual chlorine, and salt cells are a wear item that typically need replacing every 3 to 7 years depending on usage, which is an added cost down the line. Saltwater can also be a bit harder on certain metal pool equipment and fixtures over time if they're not rated for it.
For most pool owners who plan to keep their pool for several more years, the lower maintenance and more comfortable swimming experience tend to outweigh the higher initial investment.
Ready to figure out exactly how much salt your pool needs? Use our free pool salt calculator to get your precise startup dose in seconds.
Was this article helpful?